Our continued guide to bicycle lights
Here’s part two of our lights buyers’ guide. We’ve already looked at batteries and chargers, this time we’re shedding some light on the lamps themselves…
Lamps
Halogen
There’s essentially two broad categories of bulb in use in bike lights. The most common type is the halogen lamp. This is a form of incandescent light. It works by feeding electrical current through a very thin wire (the filament) which heats up to the extent that it starts to glow. In that sense it’s the same as an ordinary household light bulb or torch bulb. But the “halogen” part refers to the gas that fills the bulb and surrounds the filament. Various gases have been and are used, and the composition of the gas can vary the brightness and colour of the light and the longevity of the bulb. Halogen bulbs are particularly clever, as the bits of metal that “boil off” the filament get deposited back on there when you turn the light off, thus extending the bulb life.
The majority of bulbs used in bike lights are a standard bulb/reflector package (generically known as MR11 type). The actual bulb itself is permanently mounted into a sealed reflector unit, which both ensures a good match between bulb and reflector and ensures that you can’t physically touch the bulb. This is a good thing as greasy spots on the surface of a halogen bulb tend to heat up and cause blackening or even premature bulb failure.
The advantages of halogen bulbs are that they’re reasonably cheap, readily available in a wide variety of power outputs and beam patterns and convenient. The main disadvantage is that, while good as incandescent bulbs go, they’re not very efficient. At best you’re looking at about 10% efficiency for a halogen bulb, which means that 90% of the energy coming out of your battery is just going into making steam in front of the lights and keeping your hands warm.
HID
Until the emergence of high-power LEDs, the arc, or high-intensity discharge, lamp was the bike light state of the art, and if you want real ultimate power it still is. HIDs are considerably more efficient than halogen lamps. Instead of a filament, arc lamps have two electrodes separated by a very narrow gap. Put enough of a voltage across the electrodes and you’ll get a spark arcing between them like in an old horror movie. This can work out in the open air, but again the electrodes can be sealed into a gas-filled housing to increase longevity and improve the colour of the light. The metal halide lamps used by several manufacturers are a type of arc lamp offering a bluey-white light and high efficiency.
Gas arc lamps were originally developed for large, fixed applications like stadium lighting (hence the name of Cateye’s pioneering Stadium metal halide bike light). Getting them into cars and on to bikes took a bit of cunning electrickery. You need several thousand volts across an arc lamp to get it going (not quite as much once it’s “lit”) which isn’t too much of a problem in a sports ground but more challenging in a car or a bike with only a 12V battery to play with. Car manufacturers sorted out some cunning electronics to bump up the voltage (you’re probably familiar with the ice-blue headlights on BMWs and the like) and it wasn’t long before Cateye miniaturised the system and made a bike light out of it.
The chief advantage of metal halide bulbs is higher efficiency – for a given power, they put out up to four times as much light as a halogen bulb. This makes even the least powerful metal halide lamp considerably brighter than the most powerful MR11 halogen and you get impressive run time too.
There are disadvantages, though. Halide lamps don’t take too kindly to being switched on and off frequently (the limiting factor on the life of the bulb is the number of power cycles rather than the number of hours). This can be mitigated by clever control electronics but that again adds to the cost. The high-voltage “kick” to get them going takes it out of the battery. That means that it’s best to turn a halide system on at the start of your ride and leave it on until the end. Some riders run a low-power halogen lamp alongside to get to the trail (and possibly home again). You’ll also have to pay more to get controllable light. Simple halogen bulbs lend themselves to twin-lamp setups to give low and high-power settings, but controlling the output of a HID means recourse to clever electrickery again. And while HIDs are very efficient as lightbulbs go, they’re also only available in relatively high-power units, so if you don’t want to pay for the electrickery then the only way to extend the runtime is with bigger batteries.
The main drawback, though, is price. An MR11 halogen lamp costs a few quid. A halide lamp is about £75, and complete systems are pushing three hundred notes. If you can afford it, they’re great, but for most people a considerably cheaper halogen system is really all you need until someone else in your riding group gets a HID, at which point you all need to get one to stop your halogen systems looking like candles.
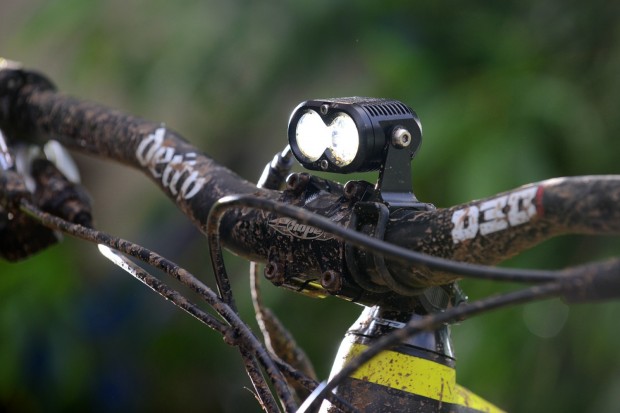
LED
There’s a third option that’s gaining in popularity and that’s Super LEDs. You’ll be familiar with regular LEDs – any bit of consumer electronics will probably have half a dozen of them – but you might not appreciate just how clever they are. Instead of filaments or arcs, LEDs generate light directly from semiconducting material. Put a current the right way across an LED and a bunch of electrons start flowing from one piece of semiconductor to the other. They lose energy as they do so, and that energy is released as photons – light. No filament means nothing to burn out. They still get hot, but rather than generating lots of heat that comes out of the front the whole unit gets hot. Too much heat will kill the LED, so good designs use lots of thermal contact and heatsinking to get the temperature down.
While on paper LEDs are only around 40-50% more efficient than halogen lamps, they manage to look a lot brighter on the trail. That’s partly because of the colour – LEDs are a lot whiter than the rather yellow halogens – but mostly because of beam patterns. Lamp efficiency is measured in terms of how much light is emitted per watt, so obviously if you concentrate that light into a tight beam there’ll be more light per unit area. The lenses currently used on LED systems tend to have tighter beams than those on halogens and HIDs, and the successful LED setups use multiple LEDs to get a decent spread of light.
A key advantage of LEDs is that they’re very controllable, and if you dim them by running them at a lower voltage they don’t get any less efficient. The control electronics are relatively simple and readily available and they’re very compact. So while not ultimately as powerful as HID units, it’s easier to make a low weight, compact, controllable and long run-time system with LEDs. The technology is still developing, though, so if you’re not an early-adopter type you might want to stick with more tried and tested systems for a bit.
Lamp types in a nutshell
Lamp type |
Pros |
Cons |
Halogen |
|
|
HID |
|
|
LED |
|
|
Beam patterns
Depending on the shape of the reflector behind the bulb, you’ll end up with either a wide, short beam, a long, thin one or a middling one. Which is best depends on the riding conditions. The faster you’re going the further ahead you need to be able to see. Conversely, if it’s slow and tricky you don’t need to see as far ahead but it’s useful to be able to see a bit to the sides.
This is more of an issue with halogen bulbs. With halides you’ve got so much light to play with that one lamp can cover the lot. But halogens have relatively limited output – if you try to spread it around too much everything becomes rather dim. Hence the prevalence of twin-beam systems. Generally one beam is a wide flood and the other is a long, narrow spot. Choose the one that’s most appropriate for the trail.
Beam patterns is a potential downside of LED systems simply because of the limited choices available, but as each generation of systems comes out the options will improve. Early units tended to have quite narrow beams but without the oomph to penetrate far enough for high-speed riding, but things are getting better.
Housings
With twin-beam setups you often want the two beams to be pointing in different directions, so having them in separate or individually-adjustable modules is a bonus. Some systems have both lamps fixed together – the manufacturer has usually allowed for the different beam patterns but you’re stuck with whatever they think is best. A good, solid attachment to the bars is essential. Hinged cam-locking clamps are common and effective.
The alternative to bar mounts is a helmet mount. If you ride tight, twisty trails you’ll probably find that a bar-mounted light is rarely pointing in the direction that you want to go, but a helmet light lets you look round corners. There are disadvantages – the extra weight on your head can make your helmet wobble about and having a light close to your eyeline makes all the shadows disappear and makes the trail look completely smooth – but on some trails you’ll struggle without one. Some riders use HIDs on helmets but the weight and bulk isn’t ideal. LEDs really shine (ahem) here thanks to their compact size. We like to run both helmet and bar lights but then you’re looking at buying a whole extra system.
Controls
With all these lights around the place, being able to control them is essential. The simplest setup for a twin-beam system is a switch on each light. We prefer up-down toggle switches to push buttons as they give you tactile feedback as to whether they’re on or not – it can be surprisingly difficult to tell otherwise. Some systems have remote bar-mounted switches that live near the grip so you don’t have to move your hand. These are useful if you switch lights a lot, although some rely on one button to cycle through settings (one lamp, the other lamp, both, off…) and it’s quite easy to get lost. A simpler method is to have a remote switch just for your spot – leave the flood on most of the time and click the spot in and out as you need it.
Sophisticated single-beam systems apply their ingenious electromagic to getting multiple power settings out of a single lamp unit, allowing you to conserve battery power when you don’t need to see as much but give it full welly when circumstances permit. How this is done varies according to what kind of lamp it is and how clever the designers wanted to get, but the really smart (read: expensive) stuff not only gives you several different power options but also lets you choose how powerful each of them is to tailor the system to your personal preferences. The posh gear will also give you things like battery displays so you know when you’re about to run out of juice, reserve modes that make sure that you’ve got a bit of battery left to get home on, “soft starts” to improve bulb life and all sorts of other toys. We’ve even seen wireless remote controls so you can operate a helmet lamp from the bars. It’s just a question of how much you’re willing to pay, but remember that a simple on-off switch and a backup light still does the job just fine…


